
-
Image
-
Image
-
Image
-
Image
-
Image
-
Image


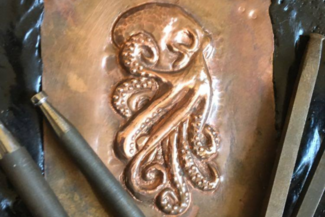
Chasing and Repoussé Basics
Learn the basics of chasing and repoussé—an ancient technique that, through the use of hammering and punch tools, allows two-dimensional sheet metal to take on three-dimensional shapes!
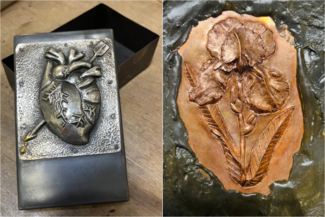
In the first of this two-session virtual class, we will learn how to transfer an image onto metal and how to attach the metal to the pitch. We will also cover the repoussé process using push tools. We will gain an understanding of why repoussé work is so essential to the visual and technical success of the front (chasing) side of the final product. We'll go through repoussé fundamentals including why metal gauge size matters; how hard to hit the metal; and how to correctly gauge depth—all of which are integral in achieving movement and clarity in the final image.
The second session will focus on the detail work of chasing. We will learn how to "line" the image, while executing each of the following techniques listed below with liners, planishers, and additional uses of the push tools.
Techniques will include:
- Raising a house "Pitch" through the use of planishing
- Creating a "Ridge with a small undercut" using push tools
- Rippling the metal to create waves also using push tools
- Creating Line Texture with liners for feathers/hair/fur
- Properly planishing for smooth surfaces
You can either use the tools that you made in De's virtual Making Chasing and Repoussé Tools workshop, or use tools purchased through Saign Charlstein listed in the materials section.
For more information about virtual courses, visit our Virtual Course FAQ page.
Meet the instructor
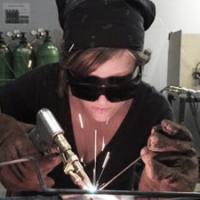
Deanna Pastel was born and raised in Cleveland, Ohio. In 2010 she received her BFA in Jewelry/Metals from Kent State University. Upon graduating, she was offered a position as a bench jeweler and trainer at Heather B. Moore Inc. in Cleveland, OH. This is where she began fine-tuning her skills in soldering gold, setting stones and hand stamping on silver and high end gold jewelry works.
In 2012 she landed in Austin, TX, and began her career as one of the main teachers and as the studio director/coordinator at Creative Side Jewelry Academy. She spent 2012-2017 developing the school’s core curriculum, while working closely with other master artists and her students.
In 2018 she was granted an apprenticeship to spend two months working alongside artist Victoria Lansford doing macro chasing and repousse, and became a presence both artistically and professionally for the Society of North American Goldsmiths. For the past three years, she has expanded to teaching at multiple schools and colleges around the Austin and San Antonio area providing eclectic and diverse course offerings at all levels of experience. She also continues to work at her bench in her home studio doing commissions, custom and repair work, as well as her personal artworks.
Materials & Tools
The following supplies will be used for course demonstrations and objectives. A suggested item and/or vendor has been provided below for reference. Click the vendor name to be redirected to a page where you can view the item. The quantities needed for each item are listed first. If ordering, please be aware that some items may come in larger quantities than needed for this class. We recommend not opening an item's packaging until the day of the workshop. Student participation during or in-between class sessions is not required - observers are welcome.
Raw Materials/Consumables
- 1 x 2"x2" (minimum) copper sheet, 22ga (RioGrande)
Additional Tools/Equipment:
- Pitch Bowl- students can choose between small or large. This is important to think about, since it will limit the size of the metal you can attach. I have several 4", but I find I use my 7.5" one more.
- 5lbs Green Pitch (RioGrande) - *This is for the 7.5" bowl. If you are using the smaller 4" bowl, order 3lbs instead.
- Chasing Hammer (RioGrande)
Students can either use the chasing tools that they made in Making Chasing and Repoussé Tools, or use the links below to purchase through Saign Charlstein.
- Chasing Tools - Students are welcome to purchase tear drop shapes and round embossers, but demoing will specifically use the four shapes mentioned below.
- Straight Liner (MetalsmithingTools)
- 1 x XS 1/8"
- 1 x S 3/16"
- 1 x M 1/4"
- Curved Liner (MetalsmithingTools)
- 1 x XS 1/8"
- 1 x S 3/16"
- 1 x M 1/4"
- Thin Oval Embosser/Push Tool (MetalsmithingTools)
- 1 x XS 1/8"
- 1 x S 3/16"
- 1 x M 1/4"
- Square Planisher (MetalsmithingTools)
- 1 x XS 1/8"
- 1 x S 3/16"
- 1 x M 1/4"
- Straight Liner (MetalsmithingTools)
Basic Home Studio
Basic Soldering/Torch Set-up
- 1 x fireproof area - steel sheet, tiles, etc. (Amazon or Home Depot)
- 1 x Solderite™ pad / pan with pumice (RioGrande or RioGrande)
- 1 x compressed charcoal block - hard (RioGrande)
- 1 x torch - Smith mini, Silversmith, or butane (RioGrande or RioGrande)
- 1 x #0 or #1 torch tip - if getting Silversmith (RioGrande)
- 1 x striker or lighter - Silversmith system has one (RioGrande)
- 1 x soldering tweezers (RioGrande)
- 1 x pickle - sodium bisulfate or citric acid (RioGrande or Amazon)
- 1 x brass bristle brush (RioGrande)
- 1 x crock pot or lidded glass container (RioGrande or Amazon)
- 1 x liquid hand soap - for cleaning metal
Other/miscellaneous items
- hard work surface
- fan and open window - or ventilation system
- safety glasses
- pencil, Sharpie, notebook
- rags/towels