
-
Image
-
Image
-
Image
-
Image
-
Image
-
Image
-
Image
-
Image
-
Image
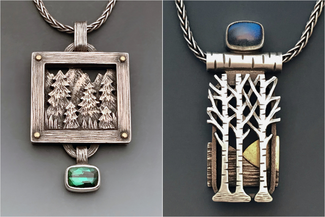


Dimensional Layering with Clasp Combinations
Explore the magic you can create with multiple dimensions, functional and beautiful clasps, and layers in metal. Over the course of this five-day master class, we will create approximately four samples using three different methods of dimensional layering for jewelry and metal art. Two of these techniques can also be used to create clasps. The goal will be to create at least 4 projects – with one or two of them able to also function as a clasping mechanism. Project samples can be finished-out as time allows. Suzanne will demonstrate how to develop designs for each method, and how to create layers and assemble the 2 or 3-layer constructions using those 3 different methods:
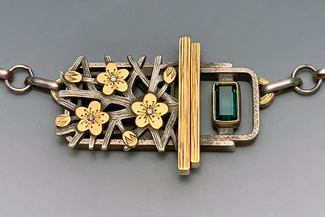
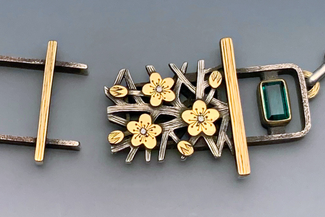
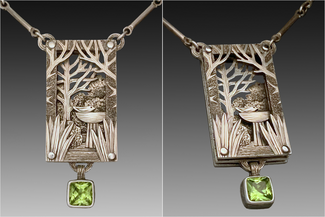
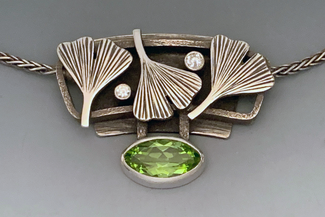
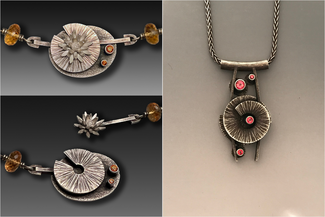
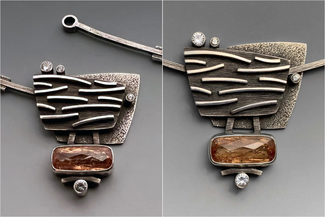
Method #1 – Cold connecting layers of sheet using rivets – multiple layers of sheet are stacked and riveted together using rivet pins in combination with spacers (crimp beads or short lengths of tubing) to create 3-dimensional constructions that have space and dimension between layers. Projects using this method can be created using mixed metals.
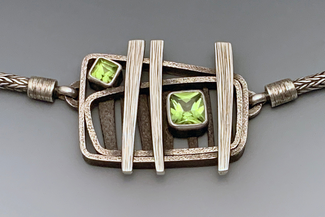
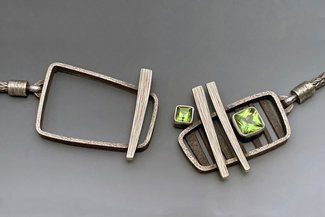
Method #2 – Rectangular wire frames and flat sheet – A rectangular wire frame acts as both a design element and a way to create space and dimension between 2 layers of metal sheet (usually sterling silver) that are soldered directly to the frame. This construction method can be modified for projects so they can also function as a 2-part clasping mechanism.
Method #3 – Flat sheet with square wire supports - In this layering method, two layers of flat sheet are soldered directly to square wire supports that create space and dimension between layers. This construction method can also be modified to become a 2-part clasping mechanism. An insert connected to one end of a chain is placed in a channel in the main component, rotated and locked - creating a secure clasp.
PLEASE READ THE MATERIALS & TOOLS TAB CAREFULLY TO BE SURE YOU KNOW WHAT TO BRING.
Please be advised: Due to the need to order supplies, we customarily close registration for our on-site offerings one week before the start date. If you wish to join the class after registration closes, please contact us at [email protected] or 781-891-3854.
Meet the instructor

Suzanne is a Colorado resident. She graduated from Colorado State University in 1980 with a degree in printmaking and later worked as a graphic artist, illustrator, fine artist, and technician in art/bronze casting foundries before beginning her jewelry-making career in 1990. She has shown her work in many galleries, art festivals and group shows. Suzanne is always developing and applying new techniques and approaches to creating her signature 3-dimensional jewelry. Three-dimensional structures that often include clasps and closures have always been an integral part of her designs, but in the past few years she has intensified her exploration of new and interesting ways that jewelry elements can be constructed and joined together. She has more recently been teaching workshops, further exploring and sharing novel and unconventional approaches to the fabrication of 3-dimensional designs and integrating them with clasp and closure methods for jewelry.
Learn more about Suzanne and view her work at her website: https://suzannewilliamsjewelry.com/about.html
Materials & Tools
There is a $70 materials fee for this class that is payable upon registration. The materials kit includes:
Sterling silver crimp beads in different lengths with an inside diameter that will fit 18g and 20g wire.
18g & 20g brass escutcheon rivet pins
Easy, medium & hard silver solders
Brass tubing and wire
Copper tubing and wire
18g & 20g brass & copper sheet
18g & 20g round silver wire (if someone wants to make their own silver head pins)
14g and 16g square sterling wire
1 x 2, 1 x 3mm and 1 x 4 mm rectangular sterling silver wire
A variety of sterling silver tubing sizes
The instructor will have a (very) limited selection of faceted stones and cabochons available for purchase if desired.
This fee also covers the cost of various other communal studio supplies needed to complete exercises and projects.
All projects can all be made with: copper, brass, a mixture of metals, or in all Sterling silver.
Silver sheet is not included in the kit. If you wish to work in Sterling silver you will need to bring your own 18 gauge sterling silver sheet (if you plan to make all or most of your projects in silver, you will need a piece that is a minimum of 2” x 3” or 1” x 6” 18 gauge Sterling silver sheet). 18 gauge brass and copper are provided in the kit.
Note: Metalwerx has available all that you will need, but these tools and supplies need to be shared, and are not always in "mint" condition. Be sure to clearly mark any tools you bring from your home studio, so they are easily identifiable.
Pliers: Round nose, chain nose, flat nose, half round/flat, and 1 pair with nylon jaws
1 x Digital calipers
1 x Dividers
1 x Ball peen hammer
1 x Riveting hammer
1 x Small anvil or steel block
1 x Rawhide or Delrin mallet
Drill bits - a variety of smaller sizes
Files – hand and needle set
1 x Wire cutters
1 x Scissors
1 x Scribe
Cylinder cone cross-cut burs, 6 pack sizes 0.6, 0.9, 1.2 mm or a set of 10 different sizes
1 x Centerpunch (a sharpened nail will work)
1 box Moore’s coarse sanding discs and snap-on mandrel
1 x sheet of 220 or 240 sandpaper
Magnification (Optivisor or other)
Closed-toe shoes - required in the Metalwerx studio
Safety glasses
N95 particulate dust mask
Shop apron
Shop towel
Notebook or sketchpad
Pen or pencil
Lunch – there will be a 1-hour break for lunch on each day of the workshop
Metalwerx has a fridge, toaster oven, and microwave
There is a deli/sandwich shop within walking distance of the studio.
Optional:
1 x 2inch x 3inch or 1inch x 6inch, 18 gauge Sterling silver sheet (see above)
Hammer handpiece for flexshaft
Diamond burs (if you have them)
Gemstones, stone settings, stamped pieces of silver, water or broom castings, decorative components, fused silver pieces, anything you might want to include in your designs